Quick Turn Garden
Two years and counting
Prepping for our empty-nesting years, we moved into the Quick Turn Garden house. The plan was to only be in this house for two years while the kids finished high school. When the kids did leave for college, we’ll move out of state to New Hampshire (finally).
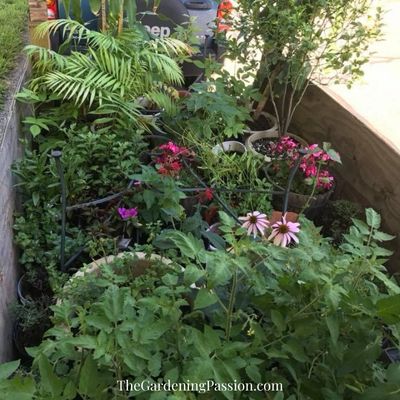
I’m not gonna lie; moving from The Gardening Passion Expands was heart-wrenching. However, selling while the housing market was on fire and finding the lite-fixer-upper house in town was the right move. To soften the blow, I dug up, potted, and took a whole trailer’s worth of plants with me! My husband and son harassed me about the ridiculousness of it all, but it paid off. Besides, a gardener can’t leave their plants behind!
In order for our kids to finish high school in the same school, we chose what we considered a “lite-fixer-upper.” Our definition of a “lite fixer-upper” was a house with an excellent structural shape and three bedrooms, but otherwise – it was a bit of a mess.
The Quick Turn Garden and yard
The Quick Turn Garden house was small and needed a lot of interior design help, the yard was an absolute mess, and of course, a garden would need to be built and planted! The goal for this house was to brighten and refine the house and yard in preparation for selling once our youngest graduated.

However, this house and property was a bit wild and dirty, with piles of junk… everywhere. Not to mention an untamed yard that did the property no favors. I knew this was the property I could handle when the realtor said, “if you’re going to choose a house on a main road to flip – the backyard has got to be an oasis.” I remember thinking, ‘yup, roger that, let’s do this.’
Step One
Simplify and brighten up the backyard
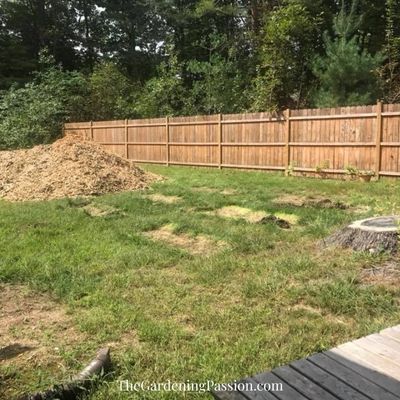
Our son, who ran a landscaping business with his buddy, was beside himself over the obstacle course that was in the backyard. Sixteen trees, eight stumps (in various levels of deterioration), and six raised boulders in the backyard had him groaning. The front yard was almost as bad, making the lawn a nightmare to mow and, frankly, a threat to their commercial equipment. We had a typical New England rock wall outlining the backyard, so we decided to remove the trees within the rock wall area and grind all the trumps to give the backyard a more defined, open space.
Simplify by removing some trees

Honestly, I imagined the sheer amount of leaves sixteen trees would dump in the fall – potentially three feet of fallen leaves to manage was a hard pass. Instead, we hired the arborist we had used in the past, who made quick work of the entire project. In addition, they put aside three hardwood trees for us to split for firewood and left two truckloads of wood chips for me to use in the garden paths. It is incredible what a small army of men and machines, including a mini-dozer, a cherry picker, a tree climber (who seemed to love his job), and a massive chipper, can do in a little more than an afternoon.
The house was structurally sound and the backyard was filled with sketchy trees. In addition, the area we lived in at the time was known for severe wind storms, and there were a LOT of tall pines – a recipe for disaster. So, yes, the yard was a mowing headache and very shaded, but we felt we would pay for tree removal or, eventually, pay to repair structural damage (or worse) if the trees came down on the house. The expense of tree removal proved to be a wise investment every season for those two years.
Step Two
Turn the rock wall into a highlight

From the massive living room windows, there is a rock wall. Landscaping it with wildflowers would create an excellent highlight in the yard against the stones. I had great success winter sowing Botanical Interests Perennial Bloom in my last garden, so that was an easy choice. I made 36 wildflower winter sowing buckets because we had one season to get new landscaping established, and I wanted these plants in the ground in early spring.
Winter Sowing is no joke – if you haven’t tried it, give it a whirl. I was able to outline a massive area with a mix of perennial or biannual wildflowers that look well-established and are hardened off by early May! A trowel full of rabbit manure at the bottom of each new plant, watered daily for a few days, then mulched with my free wood chips, and they took off! I made a total of 89 winter sowing buckets of wildflowers, veggies, and herbs! Winter sowing was truly the hero of the Quick Turn Garden, as it allowed us to get hundreds of plants up and running the first season for literal pennies!
Step Three
Paint everything
With the exception of hiring arborists, the best hour we’ve ever paid for was for an interior designer – because I am terrible at choosing paint colors. With colors selected, we set about cleaning and painting every.single.surface inside the house.
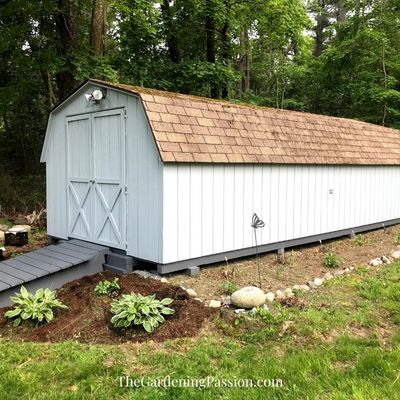
The shed itself is in great shape and huge, but the original dark brown color didn’t match the house, making it a terrible eyesore, and well, that won’t do. It is also covered in moss because the backyard had so many trees. In addition, two substantially overgrown rhododendrons were right up against the shed, causing even more moisture problems. I had my son and his buddy yank out the rhodies for me then I created a nice little bed filled with Shasta daisies and Black-eyed Susans on the outward-facing sides.
I did the planting first, then painted because I was under spring pressure. It would have been much simpler to do the shed rehab by painting and then planting. However, the sheer amount of plants needed all around the property, house, and garden forced me into a bizarre pattern to get plants in the ground asap. I had one spring window to plant everything before the summer heat hit. If the plants could get established, they would mature in the second season in time for listing the property for sale in the fall. Painting the shed and removing the moss made a huge difference.
Step Four
Prepare the ground for the garden
When we sold the last house with The Gardening Passion Expands garden, the garden and chickens created a bidding war and was an important selling point. I’m proud to say the hubba (and the realtor) were a bit surprised that the chickens and garden caused a bidding war. Luckily the first offer and the second offer battled it out. So this time around, I am confident creating a garden with various fruits and veggies for re-sell value was a no-brainer, especially in the suburbs of Boston.
The Quick Turn Garden build
Conveniently this new yard had a perfectly sized squared-off area in the corner of a fenced yard, right off the patio, and in full sun! When we first moved in, this area had a giant stump that was 3-4′ wide, smack dab in the middle. Luckily the arborists had equipment large enough to grind the stump down to the ground so you would never even know it was there. The area was substantially smaller than the last garden but fit the yard nicely.
Next, I built the – to be honest, these could be filed under garden fail. In the past, I had made boxes out of cedar kits from the big box stores. However, those were not in the budget for this garden. So I grabbed some wood and got to it. Unfortunately, I was tight on time and did zero research – and it shows in the disorganized corners and poor soil containment. Ahhh, well, lesson learned! I filled the bottom with dried and dead wood, horse manure, leaves, and good-quality soil to get going. I had a few tomato cages and trellis pieces I brought with me for the tomatoes and peas.
After the stump was ground, I laid some large cardboard pieces out to visualize how I’d like to lay out the garden. We had a large tarp we brought from the old house that I laid down on the grass first. I’m severely allergic to poison ivy, and I wasn’t taking any chances of it breaking through the mulch or having it grow through the garden boxes.
Garden Border
With everything in the garden but the herbs planted, I could go back and get the border built, mulch laid, and the final details done. I found some 4″ x 4″ x 8′ posts in the woods, so I drug them out to use as a border. There were so many I only needed to buy one to complete the border. The border was important to me to control the mulch from spreading through the grass, create a tidy look, and would make it easier to weed-wack.
In and around the property, I found large pieces of multicolored flagstone. The flagstone was found in a place that looked like it might have been part of the path to a porch at one point. I dug up my free flagstone treasure and moved them to my new garden entry paths. They visually created an attractive entry point and allowed the wheelbarrow to make a smooth entrance from grass to mulch.
Oooooh, the mulch
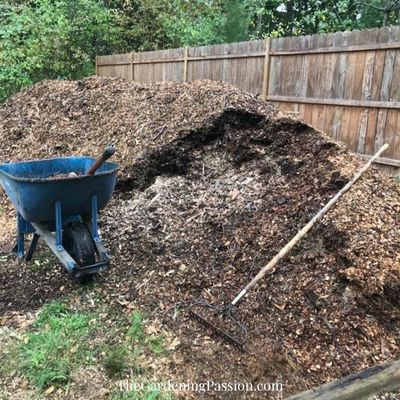
Lastly, the mulch. Oooooh, the mulch. So.much.mulch. At one point, my son took pity on me and brought over a mini dozer to help me move the mulch. So brutal. However, I love the natural look that mulch pathways create in a garden.
Fruit Beds
The fruit beds were next. I chose raspberry and strawberry beds because the fruit would emerge heavily by the second year. Both fruits are easily containable for a small area if you are consistent in their care and build a raspberry trellis.
Strawberries
Home grown strawberries – is there anything better? And easy, ya just can’t argue with perennial fruit beds!
Raspberries
The raspberries in this garden were a lesson in location – garden fail… or experiment. Planting them up against a fence created a few issues: airflow and fruit management were difficult. Lack of airflow caused some moisture issues, and because these raspberries were the thorned variety, getting all the berries from inside was difficult. Ahhh, well, lesson learned!
Gourd Trellis
Running out of room quickly but still wanting to plant more, I created an impromptu trellis for climbing varieties (sugar pumpkin and birdhouse gourds). By pounding a few stakes about 18″ from the fence at an angle and attaching welded wire fencing, I created a trellis I hoped would be covered in climbing vines. And boy, was it! At one point in the summer, that entire corner was impassable.
Herb Garden
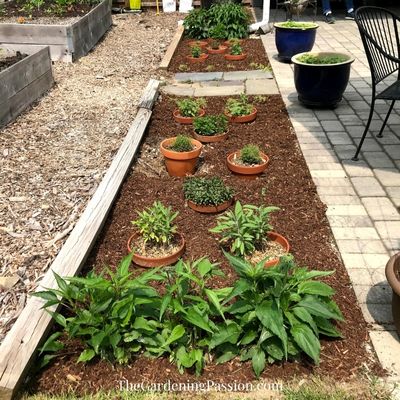
Next, I set about building the herb garden. I left a swath of soil between the patio and garden to fill with herbs, but I wanted the herb garden to be tidy and aesthetic. If you know herbs at all, well, they don’t really go for that lifestyle. To combat their wandering ways, I planted the kitchen herbs in terracotta pots to control their growth. Digging holes and planting the terracotta pots would create a neat and tidy look while also combatting the rapid moisture loss that is common with terracotta pots.
Echinacea, Sage (in terracotta pot), Rosemary (in terracotta pot), Thyme (in terracotta pot), Oregano (in terracotta pot), Chocolate mint (in terracotta pot), Spearmint (in terracotta pot), Chamomile
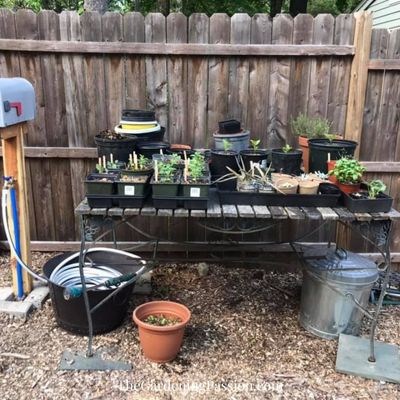
Lastly, I ordered a cedar mailbox post and a mailbox to store my tools right in the garden near my potting table. I also used the cedar mailbox post to attach the water spigot. Cute right?
The Secret Garden Goal
With the secret garden goal of creating the Quick Turn Garden using very little pocket money, I set to work repurposing materials I found around the yard. Let’s just say it was quite the treasure trove of bits and pieces. Mind you, there was still a ton of crap, like the random burn pile filled with half-burn painted wood, glass, and nails. Overall though, there were enough useable materials amongst the total to make a difference. Some materials I found in the yard (wood, flagstone pieces etc). I was able to dig up a few plants from the old house by bartering for advice and how-to garden lessons to the new owners. And, I had seeds I already had from gardens years before that I had saved.
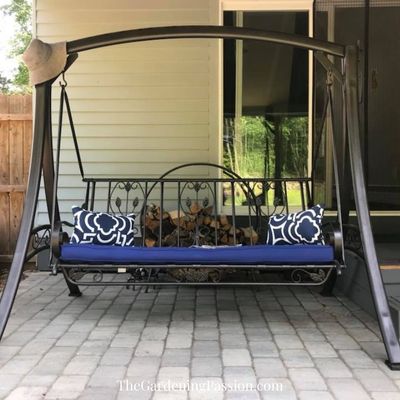
The yard ornaments & furniture came to me pre-loved and sourced entirely from FB’s marketplace. The Facebook finds were a mixed bag of repairs. Some needed a bit of love (sanding and spray paint), and one, in particular, required a LOT of love. But hey, what’s another project (insert slightly maniacal laugh)? For just under $445 I’ve built a garden and landscaped the yard all in one spring. (The tree expense was not included because most of the trees were a safety issue.) I think that’s pretty good if I say so myself because my secret goal was to stay under $500!
Garden Materials
Expenses
- two metal stakes (raspberry and gourd trellises)
- one piece 8′ long 2’x4′ wood (raspberry trellis cross posts)
- 82 ft of green coated metal wire fencing (raspberry trellis)
- misc hardware (raspberry trellis) Turnbuckles, eye ring hooks, and wire rope crimping kit
- Irish spring soap (deer and critter deterrent)
- wood/hardware for four 8’x4″ x1″ pine boards (pine garden boxes)
- threaded rebar rods (border staking)
- mailbox kit: cedar post and white mailbox
- 6-pack kale starts (roadside nursery – couldn’t resist, especially when the daughter requested it)
- eight 8″ teracotta pots (herbs and especially mints – gotta keep those suckers contained)
- one 4″ x4″ x8′ wood (garden border, needed one more piece)
- chamomile seeds (hmmmmm chamomile….)
- seed packets (rosemary, sage, thyme, oregano)
- hummingbird feeder (the old one gave up the ghost after 14 yrs)
- two rolls of white duct tape (winter sowing duct tape)
- eight gallons of white vinegar (weed control)
- spray paint (to spruce up yard sale finds)
FREE
- Free 10 yards of horse manure (sourced from a local friend and he even delivered it!)
- Free 20 yards of wood chips (sourced from tree-cutting extravaganza)
- Free 75 strawberry crowns (moved with me from the old house)
- Free 8 raspberry canes (moved with me from the old house)
- Free 2 lavender plants (moved with me from the old house)
- Free 1 thyme plant (moved with me from the old house)
- Free 1 rosemary plant (moved with me from the old house)
- Free 1 lemon balm plant (moved with me from the old house)
- Free 2 choc mint plants (moved with me from the old house)
- Free wooden packing boxes (sourced from FB page for free)
- Free 86 plastic gallon jugs (sourced from our town’s “buy nothing” FB page for free)
- Free 8 thorn-less blackberry canes (sourced from a gardening FB page for free)
Sourced from the junk left in the yard
- 19 pieces of slate (found in the front yard – it had been an old path leading to nowhere)
- 1 six-foot shepherd hook (found in the front yard)
- 5 pieces of 4″ x4″ x8’wood for the border (found in the woods, I think it was an old playset)
- 2 round 24″ cement stepping stones
- Multiple piles of wood
- 3-4 hardwood trees limbed for splitting (from the tree guys)
Saved Seeds
Sunflowers, Echinacea, Tomato, Cucumber
Brought with us from the other garden
- Perennial bloom seeds
- Eggplant seeds
- Pumpkin seeds
- Birdhouse gourd seeds
- Potting soil
- 5 panels of lattice
- White garden bench (my son made in shop class)
- Black bat house (my son made in shop class)
- Black metal windmill (my son made it in shop class – love that shop class!)
- Various ceramic pots
- Potting bench (I made from a Facebook find)
Sourced from Facebook Marketplace
- $35 wrought iron patio table ($35 bought through FB marketplace, sold new for $450)
- $80 for four wrought iron chairs ($20 each bought through FB marketplace, sold new for $155 each)
- $40 metal swing set ($40 bought through FB marketplace, sold new for $230)
- $10 wood hoop holder ($10 bought through FB marketplace, sold new for $50)
- $40 ceramic birdbath ($40 bought through FB marketplace, sold new for $115)
- $10 for two small shepherds hooks ($5 each purchased through FB marketplace, sold new for $8 each)
Quick Turn Garden plants
Produce
Raspberries, Strawberries, Sunflowers, Pumpkins, Birdhouse gourds, Eggplant, Peas, Lettuces, Cucumbers, Kale, Basil, Beans, Plum Tomatoes
Patio Pots
Lemon Balm, Lemon the lemon-less lemon tree, Container strawberries, Aloe
Rock wall Garden
Wildflowers, Lupine, Monarch (seeds I collected from a local field), Chives
This backyard rehab and garden build was a process! I had a literal mountain of wood chips and a trailer of horse manure. All in all, I think I’ve wheelbarrowed 25 odd yards of material that spring. On the upside, it’s cheaper and better than the gym… and you get a garden!
Empty-nesting… it’s all bittersweet and strangely un-anchoring. Keeping insanely busy seemed to help. Have you combated empty nesting with a garden?
Do you have any garden fails, otherwise known as “experiments”? Have you planted herbs in terracotta pots in the ground?
~ Lola
“There are no gardening mistakes, only experiments!”
Gardens we’ve built
Why I Garden; if you grow it, they will eat it
Community Oasis Garden; exploring the passion
The Gardening Passion Expands; the garden that created a bidding war
Quick Turn Garden; two years and counting
The Empty Nest Garden; totally out of control
Coops we’ve built
How NOT to Build a Chicken Coop
The Bored Engineer’s Coop
This post may contain affiliate links. These affiliate links help support this site. For more information, please see our disclosure policy. Thank you for supporting The Gardening Passion!
This content was originally published at The Gardening Passion and is copyrighted material. If you are reading this on another website, it is being published without consent.